How to install PyATS in Ubuntu Linux? Starting the Journey
Introduction
Python Automated Test Systems better known by its abbreviations PyATS, is a Python3-based test automation infrastructure. It was developed as Cisco’s internal test automation infrastructure. Then Cisco decided to release it to the public as an Open Source project. Nowusers and customers who demanded this type of solution can take advantage of it. It is currently compatible with existing Cisco tools and infrastructures and is officially endorsed by the Cisco executive team.
Although this system was developed by Cisco primarily for teams of its brand, it can also be adapted to other manufacturers. Cisco has officially developed modules to work with Juniper equipment, but I have personally adapted my tests to Huawei devices as well.
In this tutorial of several that we will be developing on PyATS, we will learn how to install it and take the most basic steps to make a functional Test Script. We will see how easy it is to install and fast to start up.
Step # 1 – Dependencies Installation
According to the official PyATS documentation, it is currently compatible with Python v3.5.x, v3.6.x and v3.7.x. Recent versions of Ubuntu come with Python3 installed so you may not have to install it. To validate if you have Python3 installed on your Ubuntu with one of the versions supported by PyATS, you can run this command:
python3 -V

The output should look like this:
Python 3.6.9
In case you don’t have Python 3 or the compatible version, you can install Python 3 from the Ubuntu repositories by running:
#Update repository list
sudo apt-get update

#If you want to install Python version 3.6
sudo apt-get install python3.6

#or If you want to install Python version 3.7
sudo apt-get install python3.7
Another important dependency is to have installed the Python package manager called PIP3. To install PIP3 you can run the following command:
sudo apt-get install python3-pipWe are now ready to install PyATS.
Step # 2 – PyATS installation
PyATS is a system of unified tools and this allows you to select and install the PyATS modules that you want to install. In our case we are going to install it FULL, with all its modules and options.
pip3 install pyats[full]All the libraries and modules necessary for its operation will be downloaded. This can take a minute or more depending on the speed of your Internet connection.
Validate the installation of PyATS and its modules by running the command:
pyats version checkThe output should look like this:
You are currently running pyATS version: 20.5 Python: 3.6.9 [64bit] Package Versiongenie 20.5 genie.libs.clean 20.5 genie.libs.conf 20.5 genie.libs.filetransferutils 20.5 genie.libs.ops 20.5 genie.libs.parser 20.5genie.libs.robot 20.5 genie.libs.sdk 20.5 genie.telemetry 20.5 genie.trafficgen 20.5 pyats 20.5 pyats.aereport 20.5 pyats.aetest 20.5 pyats.async 20.5pyats.connections 20.5 pyats.contrib 20.5 pyats.datastructures 20.5 pyats.easypy 20.5 pyats.kleenex 20.5 pyats.log 20.5 pyats.reporter 20.5pyats.results 20.5 pyats.robot 20.5 pyats.tcl 20.5 pyats.topology 20.5 pyats.utils 20.5 unicon 20.5 unicon.plugins 20.5
Step # 3 – Describe the Testbed
PyATS is designed around the concept of Testbed, where you describe your equipment under test in YAML format.
Below we will see a simple example that will allow you to build your own Testbed in YAML format. This example describes two Cisco routers with the IOS operating system.
#Example
#coding_networks_ios_testbed.yaml
#
#Global variables of the Testbed. As credentials for
# to access to the devices
testbed:
    name: coding_networks_ios_testbed
    credentials:
        default:
            username: codingnetworks
            password: cisco

       enable:
                password: cisco
#Definicion de los equipos
devices:
    ios1:      # <----- debe ser igual al nombre del hostname
        os: ios
        type: ios
        connections:
            vty:
                protocol: ssh
                ip: 192.168.56.11
    ios2:
        os: ios
        type: ios
        connections:
            vty:
                protocol: ssh
              ip: 192.168.56.12
#Definicion de la topologia. Como se interconectan los equipos.
topology:
    ios1:
        interfaces:
            Gi0/1:
                ipv4: 172.17.10.1/30
                link: link-ios1-ios2
                type: ethernet
    ios2:
        interfaces:
            Gi0/1:
                ipv4: 172.17.10.1/30
                link: link-ios1-ios2
                type: ethernet
What is striking about the Testbed in YAML format is that it is very easy to read and understand what is being defined in its structure. Anyway, although the code is self explanatory, I left some comments to clarify any doubts that may arise.
Let’s save the code built under the file name “coding_networks_ios_testbed.yaml”.
Step # 4 – Connect to computers and validate their functionality by executing commands
In this step we are going to test what is configured in the .yaml file and validate that we can connect to the computers and execute commands.
We will use interactive Python mode to perform this test and enter each of the commands shown here. To start Python interactive mode run the following command at the prompt:
python3#Load the .yaml file into an object called testbed
from pyats.topology import loader
testbed = loader.load('coding_networks_ios_testbed.yaml')If there are no errors when executing these commands, it means that the structure inside the coding_networks_ios_testbed.yaml file is well defined. On the other hand, if it presents any error, it will tell us in which line of code it found the errors.
#We are going to access the two routers ios1 = testbed.devices['ios1']ios1.connect() ios2 = testbed.devices['ios2'] ios2.connect()
These executed commands allow us to separate the routers in the ios1 and ios2 objects. By running the “.connect ()” method we log in to the computers. We will see that information is thrown on the screen of the computer.
It is time for us to run some commands and see the results:
#Let's run some commands
print(ios1.execute('show version'))
print(ios2.execute('show version'))
print(ios1.execute('show interface desc'))
print(ios2.execute('show interface desc'))
If everything went well, we will see the output of the commands sent on the screen. With this we can already say that we are ready to design the test script.
Step # 5 – Design your Test Script
PyATS is about testing; and the absolute cornerstone in testing is the actual test script. In pyATS, test scripts are written and executed through the AEtest module.
Test scripts are structured Python files that contain and describe the tests you want to perform. A clean and elegant test script is scalable and generates easy-to-read test results and logs.
Let’s see below a test script in which we are going to test the connectivity between the two routers using the ping command.
# Example. This example is a modification of the example found in the official PyATS documentation
# -------
#
#   connectivity_check.py
from pyats import aetest
import re, logging
#crear un logger para este modulo
logger = logging.getLogger(name)
class CommonSetup(aetest.CommonSetup):
    @aetest.subsection
    def check_topology(self,
                       testbed,
                       ios1_name = 'ios1',
                       ios2_name = 'ios2'):
        ios1 = testbed.devices[ios1_name]
        ios2 = testbed.devices[ios2_name]
        # Agregar los objetos de los routers a los parametros de TestScript
        self.parent.parameters.update(ios1 = ios1, ios2 = ios2)
        # Obtener los enlaces de interconexion entre ios1 y ios2
        links = ios1.find_links(ios2)
        assert len(links) >= 1, 'requiere un enlace entre ios1 y ios2'
    @aetest.subsection
    def establish_connections(self, steps, ios1, ios2):
        with steps.start('Conectando a %s' % ios1.name):
            ios1.connect()
        with steps.start('Conectando a %s' % ios1.name):
            ios2.connect()
@aetest.loop(device=('ios1', 'ios2'))
class PingTestcase(aetest.Testcase):
    @aetest.test.loop(destination=('172.17.10.1', '172.17.10.2'))
    def ping(self, device, destination):
        try:
            result = self.parameters[device].ping(destination)
        except Exception as e:
            self.failed('Ping {} from device {} failed with error: {}'.format(
                                destination,
                                device,
                                str(e),
                            ),
                        goto = ['exit'])
        else:
            match = re.search(r'Success rate is (?P<rate>\d+) percent', result)
            success_rate = match.group('rate')
            logger.info('Ping {} with success rate of {}%'.format(
                                        destination,
                                        success_rate,
                                    )
                               )
class CommonCleanup(aetest.CommonCleanup):
    @aetest.subsection
    def disconnect(self, steps, ios1, ios2):
        with steps.start('Desconectando a %s' % ios1.name):
            ios1.disconnect()
        with steps.start('Desconectando a %s' % ios2.name):
            ios2.disconnect()
if __name__ == '__main__':
    import argparse
    from pyats.topology import loader
    parser = argparse.ArgumentParser()
    parser.add_argument('--testbed', dest = 'testbed',
                        type = loader.load)
    args, unknown = parser.parse_known_args()
    aetest.main(**vars(args))
Step # 6 – Run your Test Script
With our script written and saved, I can run it from the command line:
$ python3 connectivity_check.py --testbed coding_networks_ios_testbed.yamlBy running the previous command, the test will run and we will see on screen the details. At the end we will see a report of the test result indicating if it passed or failed.

This is the quickest way to see the test script in action – everything prints directly to the screen, so you can edit, run, edit, and rerun until the test fits perfectly.
Step # 7 – Create a Job
A Job is a previous step by simply running script tests as executable and getting results in STDOUT. Job files allow test scripts to run as tasks in a standardized runtime environment, allowing test scripts to run serially or in parallel, and aggregate their records and results in a more manageable format.
# Example: coding_networks_ios_job.py
# -------------------
#
# A Job file in its simplest form to run the above code.
from pyats.easypy import run
def main():
    # The run function, runs a test script as an individual task.
    run('connectivity_check.py')
To start a Job, use the “pyats” command. The Testbeds handler plugin uses the argument –testbed-file, to load the .yaml file and parses it automatically.
When started, each script called by the run () API within the job runs as a child process, and the content inside its if name == ‘main‘ block is ignored. Add the –html-logs argument to allow generation of HTML log files; they are easier to read.
bash$ pyats run job coding_networks_ios_job.py --testbed-file coding_networks_ios_testbed.yaml --html-logs --liveview-host 192.168.56.56 --liveview-port 8080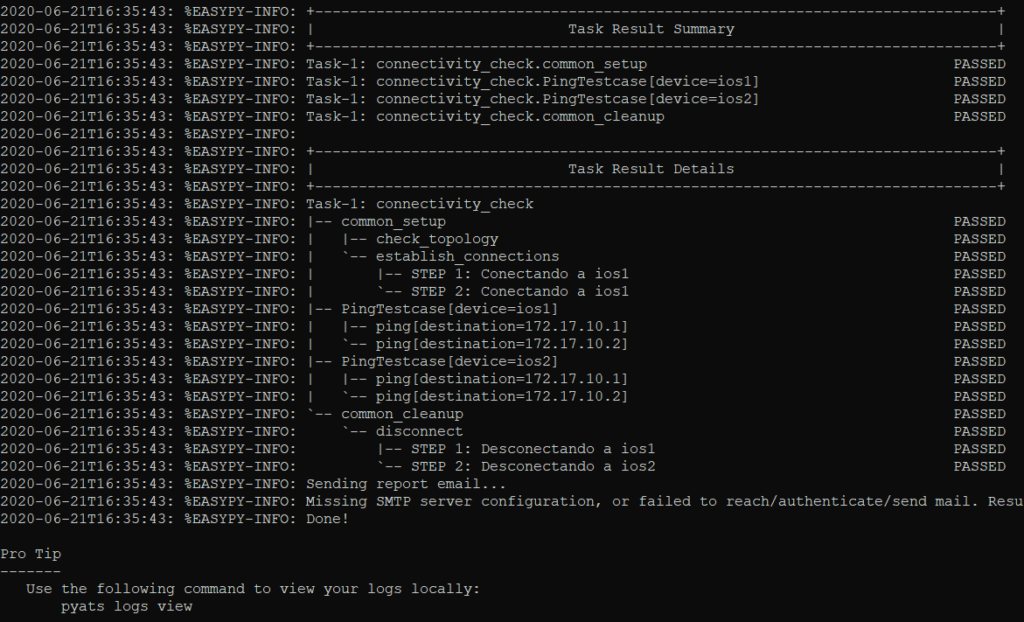
The output is very similar to when we run the script using the Python3 command. However, via a Job, by default, the results of a Job are saved in a compressed folder containing files that describe the runtime environment, what was run, the result XML files, and the log files.
All this information can be seen via a web browser in HTML format using the following command:
$ pyats logs viewOutput:
Logfile: /home/codingnetworks/.pyats/archive/20-Jun/coding_networks_ios_job.2020Jun21_16:35:11.778120.zip

View at:
http://localhost:62118/
Press Ctrl-C to exit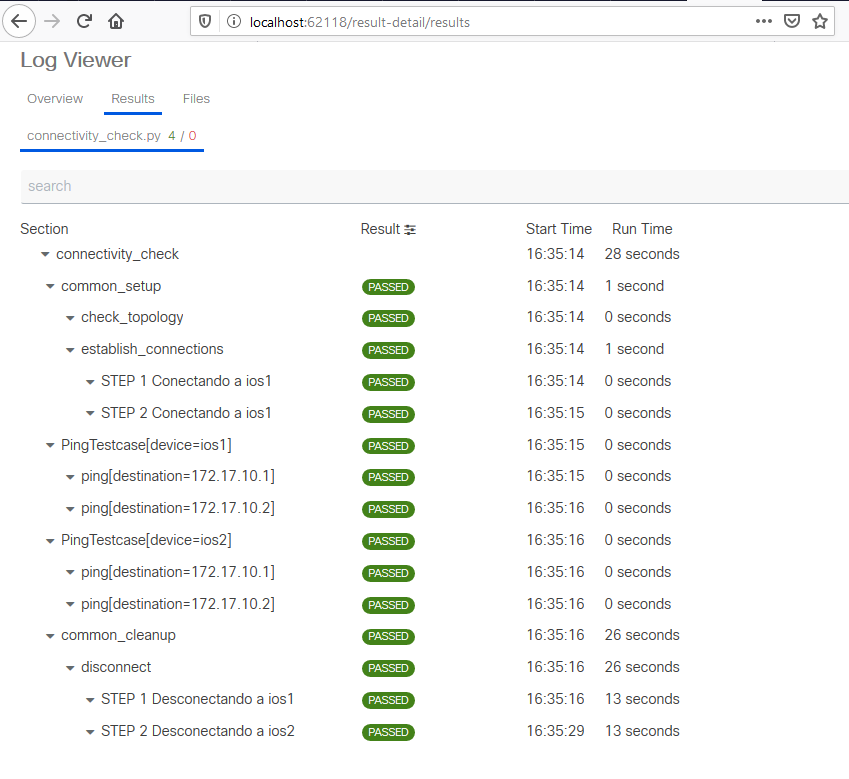
Continue learning
Now you understand the basic components of pyATS. This is just the beginning, there are many more functions in pyATS to explore. More information about PyATS can be found on the Cisco Developer page.
If you have questions or doubts about what you saw in this post or about what you find in the official documentation, comment below and we will gladly clarify your doubts.

By
Related Posts

Cisco ACI Simulator on VMWare Workstation 15 for Windows 10

Learning Docker from Zero. My Cheatsheet explained.

Learning Git from Zero. My Cheatsheet explained.