Learning Git from Zero. My Cheatsheet explained.
Important Note: This is a under development post, that i have used as cheatsheet and save notes in my learning path.
What is Git?
Git is a software for tracking changes in any set of files, usually used for coordinating work among programmers collaboratively developing source code during software development. Its goals include speed, data integrity, and support for distributed, non-linear workflows (thousands of parallel branches running on different systems).
Definition from Wikipedia
I think this definition is a great start to understand in essence what git is.
Git Architecture
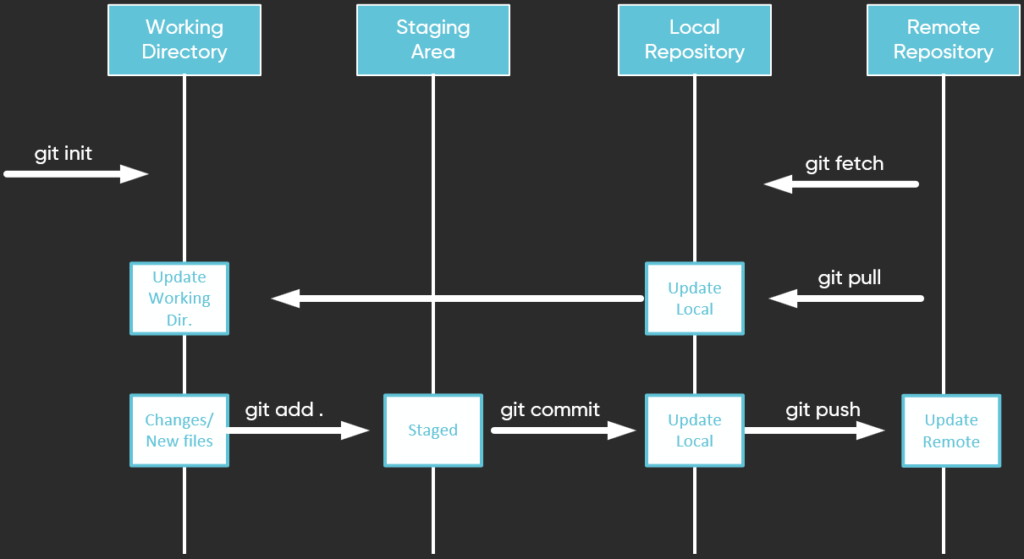
Git Architecture is composed of the remote repository and several distributed local Git environments, where each of them includes a local repository, staging area, and working directory:
Working Directory
A Working Directory is the actual file system directory that is controlled by Git. It is a sandbox where you do the actual work. Files that are tracked by Git are continuously compared with a snapshot found in the Staging area. In case of any changes, Git marks those files with the modified flag. Other changed or new files are marked as untracked.
Create a local repository
git initYou can check the status of the files using the
git statusStaging Area
The Staging Area is where all the changes that you want for your next commit are placed. By moving untracked files to the staging area, those files become tracked and are included in further Git checkups.
git add .Local Repository
A local repository is a clone of the remote repository where commits are stored on each individual person’s local machine. It can also include additional branches that you created locally and decided not to share with others.
With the git commit command, you move the snapshot of the Staging area to the local repository. There it is saved as a new commit in the currently used branch. Files that are not staged are not included in the commit.
git commitThe commits that you have done locally are synchronized with the other repositories with the use of
git fetchgit pullgit pushCommit History
You can check the history by using the git log command, which by default lists the commits in reverse chronological order. Starting with the most recent commit you can see its hash, the author’s name and email, the commit time, and the commit message.
git logThe git log command is equipped with several useful options that you can use to check exactly what you need…………..
Remote Repository
A remote repository is where the files of the project reside and where all other local copies are pulled from. It can be stored on an internal private server or hosted on a public repository such as GitHub or BitBucket.
git cloneGit Concepts
Git Pointer
Git uses yet another special reference pointer named HEAD
Configure tooling
Configure user information for all local repositories
$ git config --global user.name "[name]"Example:
$ git config --global user.name "Michael Alvarez"Sets the name you want attached to your commit transactions
$ git config --global user.email "[email address]"Sets the email you want attached to your commit transactions
Branches
Sooner than later, you want to diverge from the main branch and create a new one, where you can work without affecting other branches. For that you can use the git branch command, which simply creates a new branch pointer, that is referencing the current commit. If you checkout a branch, the HEAD starts mirroring the branch pointer, which means that it is pointing to the tip of the branch.
A Git branch is very simple. It has its name and a pointer to one of the commits. The initial repository branch is named master and is automatically created at the very beginning.
Branches are an important part of working with Git. Any commits you make will be made on the branch you’re currently “checked out” to. Use git status to see which branch that is.
Creates a new branch:
git branch [branch-name]
Create a new branch and switch to the specified branch
$ git switch -c [branch-name]Switch to branch. This also change Working directory files.
$ git switch [branch-name]$ git checkout [branch-nameIf you need to check out a specific commit, you can use the git checkout command, adding a specific commit hash or a tag, if available.
$ git checkout [commit]
In this case, HEAD is pointing directly to a commit rather than mirroring a branch. The detached state, as this is called, allows you to run, test, or troubleshoot the software. However, if you want to commit a change, you first need to return to the attached state. To do that you can create a new branch in the detached state or check out an existing one.
By checking out or merging a different branch, you override the working directory.
$ git merge [branch]
Combines the specified branch’s history into the current branch. This is usually done in pull requests, but is an important Git operation.
$ git branch -d [branch-name]
Deletes the specified branch
Tags
Git has a very useful tagging feature, which enables you to tag a specific commit with human readable text. Usually that is used to tag the releases, when the code in a specific branch is stable enough to be released but can also be used for other purposes.
Stash
It sometimes happens that you are in the middle of work when you need to do some urgent fixes or even switch branches. Before doing that, you first need to clean your working directory. Instead of creating a temporary branch and committing unfinished work, you can choose to save all your modified files into a separate snapshot called stash.
git stashgit stash push -m "working in progress"git stash popgit stash saveGit Advanced Options
Compare Local branch with Remote Branch
Compare Local branch vs Remote before doing a git pull it’s sometime useful
git diff <local branch> <remote>/<remote branch>
git diff main origin/main
If you are not satisfied with the results or if there were conflicts detected, you can still decide not to commit, but rather abort the merge
Merging branches
It is quite bold to let the merge also automatically commit. Even without any detected conflicts, it happens that developers do some incompatible changes in parallel. Therefore, it is not a bad idea to stop the automatic commit
git merge --no-commitIf you are not satisfied with the results or if there were conflicts detected, you can still decide not to commit, but rather abort the merge
git merge --abortThis action tries to revert your working directory back to the previous state before merge was invoked
Git merge preserves the complete history and chronological order of the commits in the repository. That is a nice feature, especially when you are working on a code that originally was not yours or the code is too old to remember why you made it as you did. With the full history, you can review the intermediate commits and sense the context more easily. However, working with lots of contributors, history can become overpopulated with numerous merge commits.
On the other hand, you can keep a more linear history by using the rebase integration method. The idea is to rebuild your feature branch on top of the main one.
git rebase [branch]In both cases, using merge or rebase, you end up with the same results. The difference is just the history and potential problems you can encounter with distributed teamwork. Rebase can be a perfect choice in cases where you have a short-lived branch that you do not push to the remote repository. However, once you push your work with all the history of your branch to other teammates, forging of the history in a distributed environment can become a nightmare.
There are also some other options for integrating work from one branch to another. One of them is cherry-picking. With that method you can choose a single commit from one branch and apply it onto another. In this case, Git does not search for a common ancestor, but instead just tries to reapply the selected snapshot. First you switch to the branch you want to apply the commit to, then you run the git cherry-pick <commit-hash> command.
git cherry-pick <commit-hash> Resolving Conflicts
Git performs an automatic merge almost every time you merge, rebase, cherry pick, revert, and even when you pull a remote branch. During that merge, Git must decide at each step if the new file change is conflicting any previous change.
git log --mergeUsing the –merge option with the git log command produces a log with a list of commits that conflict between the merging branches.
To resolve the conflict, you must decide and change the file to its desired state. There are several ways to do this. You can simply use an editor, search for the conflict markers, and make all necessary modifications. Alternatively, if you know that one version of the complete file is better, you can simply choose one of the versions, called “ours” (HEAD) or “theirs” (feature branch).
git checkout --ours my_network.pygit checkout --theirs my_network.pyAfter resolving all conflicts, you also must stage the unmerged files with $git add command and finalize the merge with $git commit command. If you are not satisfied with the merge results or you just do not have time to solve the conflicts, you can, at any time, abort the merge with the git merge –abort command or reset conflicted files to the last commit.
Rollback Commited Local Repository Changes
If you have not yet pushed your commits to a remote repository, you can rework the most recent commit by first staging changes that you want to add to the last commit and later commit again with the –amend option
git commit --amendIf you need to revert several commits, you can use
git reset <hash-or-ref>This action moves the reference branch pointer backward to the desired commit in the branch history. The unwanted commits are not deleted, but they are not part of any branch anymore.
You have three options for instructing Git how to handle the snapshots from detached commits and the working directory while performing the reset:
- Hard reset: (–hard) overrides everything. Branch and HEAD pointers are moved to reference the chosen commit, while the working directory and staging area are synchronized with that old snapshot. To avoid losing any working changes, you can use the git stash and git stash pop commands accordingly.
git reset --hard <hash-or-ref>- Mixed reset: (–mixed) Resets the index but not the working tree (i.e., the changed files are preserved but not marked for commit) and reports what has not been updated. This is the default action. If -N is specified, removed paths are marked as intent-to-add.
git reset --mixed <hash-or-ref>Soft reset: (–soft) works similarly to a mixed reset, with the addition that the working directory is preserved. Soft or mixed reset can be used to make the history cleaner by squashing several commits into a single commit.
git reset --soft <hash-or-ref> Rollback Commited Changes of a Single File
If you do want to revert only changes of a single file and not the whole commit, you can use:
git restore --source [commit id] <path/to/file>Rollback Staged Local Repository Changes
If you executed “git add” to stage a file, you can run the following command to unstage:
git restore --staged <path/to/file>Rollback Working Local Repository Changes
To reset unstaged files in the working directory run:
git restore <path/to/file>Rollback Remote Repository Changes
If you have already pushed your commits to a remote repository, the reset becomes trickier. Undoing changes without rewriting history is usually a better option.
git revert <commit-to-eliminate>The git revert command does not remove any previous commits, but creates a new commit that only reverts the changes of the specific commit. This works well for published changes because then the true history of the repository is preserved.
By
Related Posts

Cisco ACI Simulator on VMWare Workstation 15 for Windows 10

Learning Docker from Zero. My Cheatsheet explained.

How to Deploy Cisco UCS Platform Emulator on VMWare Workstation 15 for Windows 10?