
Introduction
SecureCRT is a solution that offers great help to Network Engineers in terms of efficiency when it comes to managing and operating a network. The set of tools it brings allow us to streamline and automate tedious and repetitive tasks. As you will have seen in my articule SecureCRT for Network Engineers, there are many benefits that we can obtain. There are even more benefits that combining SecureCRT with Python.
For those who still operate networks through the CLI, SecureCRT provides us with an excellent opportunity to introduce ourselves with Network Programmability and Automation.
Routine configuration or verification tasks can be automated using powerful “Scripting” capabilities including ActiveX scripting support for VBScript, JScript and PerlScript on Windows and Python support on all platforms (Windows and Linux).
In this article you will see what you need to learn to start writing your own Python Scripts and automate tasks. It is important that you have SecureCRT installed so you can get the most out of it. On the official website of SecureCRT you can download a 30-day evaluation.
Python Scripting in Secure CRT
SecureCRT contains a built-in Python interpreter, which means that Python scripts can be run from SecureCRT without having to install additional software.
SecureCRT scripts are text files that are created with any text editor.
A header is not required. It is not necessary for Python scripts as long as the “.py” file extension is used. If you want to use a header (for example, if you are using a file without an extension or with an extension that is not common), the header must start on the first line of the script.
SecureCRT will use the script headers to identify what language the script is written in and the version of the SecureCRT script interface. Each line of the script header must start with hash (#). A script header in SecureCRT includes a $language line that identifies the language of the script and a $interface line to identify the interface version of SecureCRT.
The syntax of the script header is always the same, regardless of the script language you are using.
Here is a simple but complete SecureCRT script with a header that identifies it as Python:
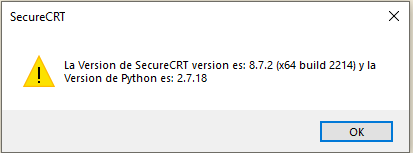
# $language = "Python"
# $interface = "1.0"
import platform
def main():
  # Imprime version de SecureCRT y Version de Python
  crt.Dialog.MessageBox("La Version de SecureCRT version es: {0} y \
                   la Version de Python es: {1}".format(crt.Version, \
                   platform.python_version()))
main()
This code when running prints:
Using the Main Function
There is no requirement that require to insert your code inside the Main () function, however there may be reasons why you want to do this. The Python interpreter will parse and execute the global script code (script code that you defined outside of any function) before its Main () is executed. If you have an “initialization” code that you want to make sure is fully executed before your actual script code begins, it may be helpful to locate your initialization code globally. This will ensure that your initialization code will be executed before your main code is executed.
Another reason why you may want a Main () function is to allow your scripts a way to abort in case of problems. In Python for SecureCRT, there is no built-in way to exit a script globally. However, if you want to exit a function, you can use Return keyword to do so.
Python objects for SecureCRT
The scripts interact with SecureCRT through objects, methods and variables found in the SecureCRT module called “crt”. You can also instantiate these objects and access their methods and variables. Example:
#Creating a sub-object from "crt.Dialog" and calling the methodPrompt
dialogo = crt.Dialog
dialogo.Prompt("Inicia Sesion:")
#Calling the prompt method directly from the "crt" object
crt.Dialog.Prompt("Login:")
Basically these two ways of using the Prompt method give the same result.
The “crt” module contains the following objects that can be used to create scripts in Python:
- Arguments Object. The Arguments object allows scripts to access arguments that are passed to the script by one or more SecureCRT / ARG command line options.
- Clipboard Object. The Clipboard object provides access to the application clipboard.
- Command Window Object. Provides access to the command window.
- Dialog Object. The Dialog object provides access to simple user interface functions provided by SecureCRT.
- File Transfer Object. The File Transfer object provides methods for performing script-initiated file transfers.
- Screen Object. The Screen object provides access to the SecureCRT terminal screen.
- Session Object. The Session object provides access to the status and properties that exist for the current connection or session.
- Session Configuration Object. The Session Configuration object provides methods of accessing session settings using scripts.
- Tab Object. The Tab object provides access to the tab functions that exist for the current connection or session. The Tab object can also be used to work with tiled session windows.
- Window Object. The Window object provides access to properties and methods related to the SecureCRT window, such as the visible state of the window, the title, etc.
Later we will talk a little more about the objects most used for the tasks that we normally carry out.
How to run a Python script on SecureCRT?
In the previous section we saw a simple and functional Python script for SecureCRT. However, what we didn’t talk about was how to run this script. SecureCRT provides a menu to run, stop, or cancel a script.
Menú Script
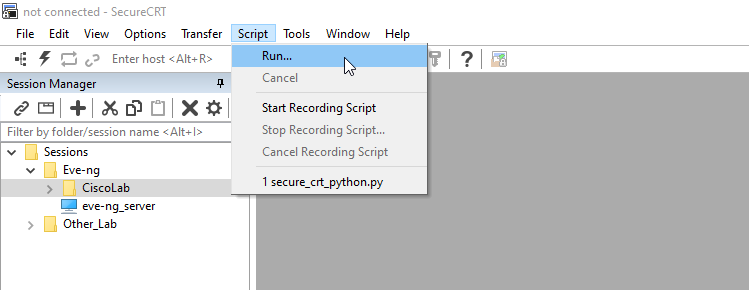
Option: Run
Opens a dialog box, where you can choose and start a script.
Right now you can try run a code taking the test code of the previous section, save it to a file, and try to run it using the Run option.
Option: Cancel
Cancel the currently running script.
Option: Start Recording Script
When this option is selected, all keystrokes and responses in the current session will be recorded until the Stop Recording Script or Cancel Recording Script option is selected. If a script is recorded and a session is disconnected, you will be asked to save the script.
Option: Stop Recording Script
Stops recording in progress and prompts you to save the recorded script as a Visual Basic (.vbs) or Python (.py) script file. If a script is recorded and a session is disconnected, you will also be prompted to save the script.
Option: Cancel Recording Script
Stops recording in progress and nothing is saved.
Sample Scripts for SecureCRT
The SecureCRT installation also includes a folder with sample scripts in Visual Basic and Python. These scripts can be used very well to see how objects work. Many of us take advantage of them to get ideas and look for use cases in our tasks.
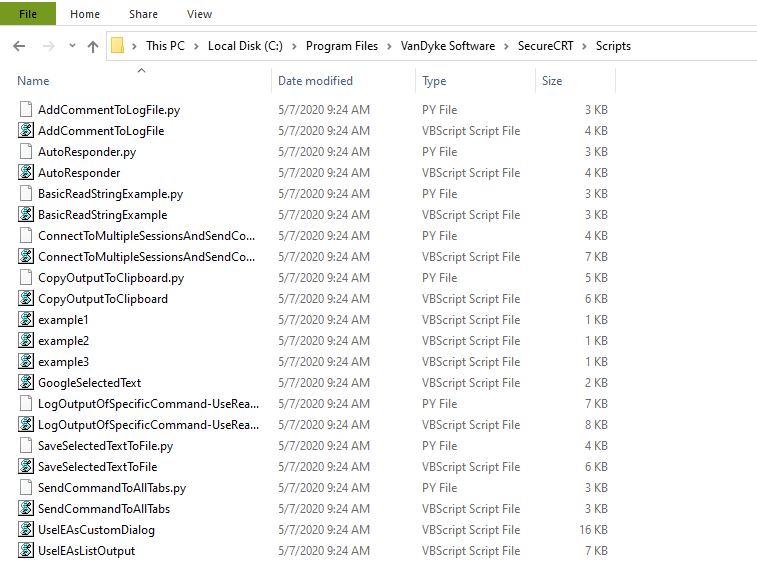
Let’s look at some examples of these Scripts and think about use cases.
Script: AddCommentToLogFile.py
This sample script allows you to add a line of custom text or comment to the file that you enabled to do Session Logging (save logs). The user will be prompted to add the text to the Log file; registration will stop; user-supplied text will be added to the Log file; the Log file will then be activated again to the session in which the script ran in SecureCRT.
What the script does is simple, but what’s interesting is everything we can learn from this demo:
- Request data entry to the user using the SecureCRT function
InputBox (). - Access
Session.LogFileNameto determine the name of the stored Log file for the current session. - Use the property
Session.Loggingto determine if the Log is currently active. - How to use the Python method
replace ()to replace Substrings within an existing String. - Make use of the object
"File"Python to open an existing text file and add data.
Use cases that we can give to what we have learned from the point of view of a Network Engineer:
- With this Script we can learn to create an assistant that asks us for a username and password before accessing to a router to make configurations or collect information.
- We can activate the Logging of a session and save specific command outputs in a router. NOTE: Capturing the command outputs requires a function that is not in this script and that we will see later.
- It is possible to capture the output of the commands sent to a router, change certain texts, adjust them or add comments before saving it in a text file. NOTE: Capturing the command outputs requires a function that is not in this script and that we will see later.
Script: AutoResponder.py
It shows how to configure a list of commands / text that are sent to the equipment that we are connected to as soon as a “trigger” text sent by the equipment is detected. Once started, this script will run indefinitely until the session is disconnected or the application is closed. To stop the script, choose “Cancel” from the SecureCRT “Script” main menu.
What the script does is simple, but what’s interesting is everything we can learn from this demo:
- How to use the property
Session.Connectedto determine if the current tab has an active connection. - How to wait for one of the multiple string values to appear and detect which one was found using the method
Screen.WaitForStrings.
Use cases that we can give to what we have learned from the point of view of a Network Engineer:
- We can send commands to a router, wait for the output and based on the result make multiple decisions. The script can execute a configuration if certain conditions were met.
Script: BasicReadStringExample.py
This example script captures the output of a command (ls -l) sent to a remote machine using the method Screen.ReadString ().The captured text is displayed in a message box window.
What the script does is simple, but what’s interesting is everything we can learn from this demo:
- How to use the basic functionality of the method
Screen.ReadString ()to easily capture data from a remote system. - How to use the property
Screen.IgnoreEscapeto change the way thatReadString(also applies toWaitForString ()andWaitForStrings ()) handles non-printable characters.
Use cases that we can give to what we have learned from the point of view of a Network Engineer:
- With this script we can send a “show configuration” to a router, capture the output and perform a backup saving the result in a text file.
Script: LogOutputOfSpecificCommand-UseReadString.py
Sends commands one by one as listed in the COMMANDS array to the remote computer. The results of each command are captured in a variable and then written to an individual Log file (one log file for each command). Once all the commands have been run, a file browser starts, with the first command output file selected within the file browser window.
This sample script shows how to record the output of specific commands in separate files (one file for each command) without having to manually activate the login before and after executing each command.
What the script does is simple, but what’s interesting is everything we can learn from this demo:
- Use an array of commands to be sent to the remote system (COMMANDS)
- Implement
SCRIPT_TAB.Screen.Send ()to issue each command. - Using the method
SCRIPT_TAB.Screen.ReadString ()to not only wait for an indication that the command sent has been completed, but also to capture all the text received while the command was running.
Use cases that we can give to what we have learned from the point of view of a Network Engineer:
- This is a good script to be able to generate another that allows us to carry out a survey of services on multiple computers, saving the commands in an array, sending the commands to the screen and capturing their output. Using functions from other scripts we can save these outputs in a text file.
Script: CopyOutputToClipboard.py
This sample script is designed to run while connected to a Cisco Pix firewall or other router device.
When started, the following commands are sent to the device:enableconfigure terminal pager 0 show config show serial show sysopt exit exit
The command results ‘show config', 'show serial' y 'show sysopt‘ they are captured and stored in the system clipboard. Then a message box displays the contents of the system clipboard.
What the script does is simple, but what’s interesting is everything we can learn from this demo:
- Use of
crt.Screen.ReadStringto capture the output of a command as it is repeated on the remote system. - How to copy data from a script variable to the system clipboard using the crt.Clipboard object.
- Using the method
ReadStringto find a shell prompt (so you can determine when a remote command has completed) or some other full line of data. - Use the Python method
str.replaceto replace text within an existing string.
Use cases that we can give to what we have learned from the point of view of a Network Engineer:
- This script in itself is already a use case for Network Engineers, in which you can simply change the commands for others and obtain the desired result.
Script: SendCommandToAllTabs.py
This example script shows how to send the same command to all tabs that currently have an active connection.
What the script does is simple, but what’s interesting is everything we can learn from this demo:
- Send a command to all tabs using SecureCRT’s tab scripting capability
- Request the user to enter data using the method
crt.Dialog.Prompt (). - Access the total number of tabs in the SecureCRT window using the property
crt.GetTabCount - Activate a tab in the user interface from a script.
- Use the property
Session.Connectedto determine if a tab currently has an active connection or not. - Send data to a tab using the screen. Shipping method in SecureCRT.
Use cases that we can give to what we have learned from the point of view of a Network Engineer:
- With this equipment we can learn to make configurations or collect information from routers simultaneously in multiple SecureCRT sessions.
Conclusion
In this article we were able to learn about a large part of the functionalities and opportunities that we have to implement Python Scripting via SecureCRT. With this we can improve our skills and be more efficient when working with network devices that are managed through the CLI.
Wait soon for Tutorials and Practical Courses where you will learn to implement what you have learned today in your work environment.
Below I share this link where you can find other Python Scripts in SecureCRT official webpage:
https://www.vandyke.com/support/securecrt/python_examples.html
Discuss any questions, concerns or suggestions that you have in the comments below.